Ticket System User Guide
Welcome to the Clear Imaging Ticket System User Guide! Please read the information below carefully to find answers to the most commonly asked questions. Learn how to submit website updates, request e-mail updates and other support requests. If you don't find the answer you're looking for, simply log-in to our Ticket System and submit a "Help" request.
Introduction
- Setting up a "Ticket System" Account is easy and only takes a few minutes. Here's how you do it:
- Go to your new website that we built for you.
- At the very bottom of your website homepage, click on the "Support" link.
- This will open a new internet browser that displays our Clear Imaging website Support page.
- Click on the link that says: "If you're a new User, click here sign up for a new account".
- Complete the required form fields, then enter the 4-digit code and then click the "Submit" button.
- We will approve your access registration within minutes. You will receive a confirmation by email.
- Then, go back to your new website, click on the very bottom "Support" link again.
- This will re-open our Clear Imaging website Support page again.
- Now, enter the email address and password you just used to register, and enter the 4-digit code and then click the "Submit" button.
- Once you are logged in, click on the "Get Started" link in the top left box that says: "Go to your Ticket System Administration Area".
- Read the Important information that is displayed on this Main page.
- Then click on the top header bar link called "New Ticket" and submit your updates/requests.
- If you need assistance, we highly recommend you click the top header bar link "User Guide".
This guide contains definitions and examples of proper website instructions. The examples cover the majority (70%) of various website updates but can not cover all of them as the remaining percentage are completely custom and are based upon specific situations and modifications.
The speed and quality of your website update assignment depends upon the quality of the communication of the website assignment instructions.
Before proper communication can take place both parties must have the same definitions of the terms they are using. Read on to 'The parts of a website' section to find out the names of certain parts of websites.
Important Notes
support@clearimaging.com
donotreply@clearimaging.com
- To submit updates for your website, click on the "New Ticket" link at the top of the main page.
- When submitting your Ticket requests, please write very detailed and specific instructions so that we may fully comprehend your exact needs. Otherwise your ticket will be sent back to you for further explanation, which will delay the completion time.
- Our Support Team will complete the task(s) and reply back to you within 1-3 days, depending on the amount of work that is required. In some cases, numerous tickets or timely updates may take up to 5-7 days or more.
- You may add notes to, or reply to any "Open" Tickets. Do NOT reply to any Open or Closed Ticket via regular e-mail. It will not be seen or answered. Always reply to the same Ticket.
- You may "Re-Open" any "Closed" Tickets in order to reactivate the Ticket and submit further changes or comments, but only if the Ticket was not properly completed. Do NOT re-open a Closed Ticket to submit new changes.
- In order to speed up the process of completing your Tickets, we ask that you compile multiple web site updates/changes into a Word Document or PDF and attach it to just one Ticket.
- There is no need to submit multiple New Tickets for multiple web site updates/changes. This only slows down the time it takes to complete them. Unless they are drastically different topics, such as website updates versus email issues, then a separate ticket would make sense.
- Do NOT submit multiple New Tickets for sending us photos or images. Rather, categorize all your photos into sub-folders within just 1 main folder, and then zip this main folder. Then upload the main zip file into a New Ticket. (See below for instructions on attaching files)
- Please give us ample notice and time for updates that coincide with an advertisement or promotion you are sending to your customers.
- Please submit Tickets for email set up requests and email related issues before calling us. Otherwise we have no way of tracking the status of the issue. If need be, we will call you if we need more information to troubleshoot the issue.
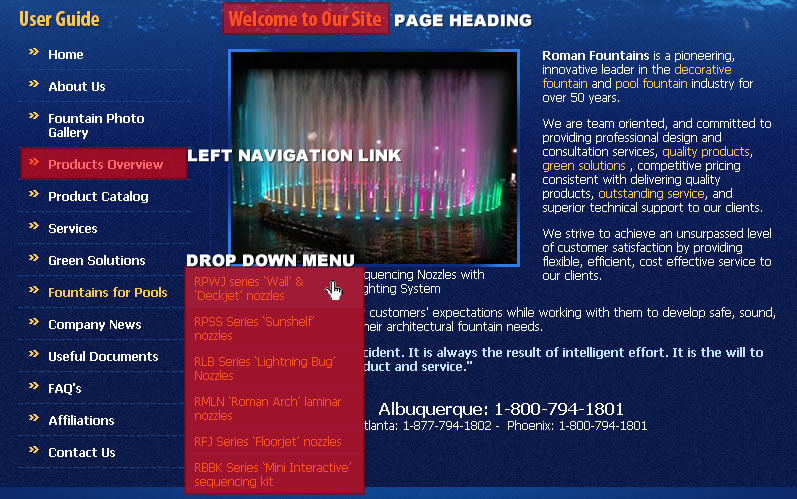
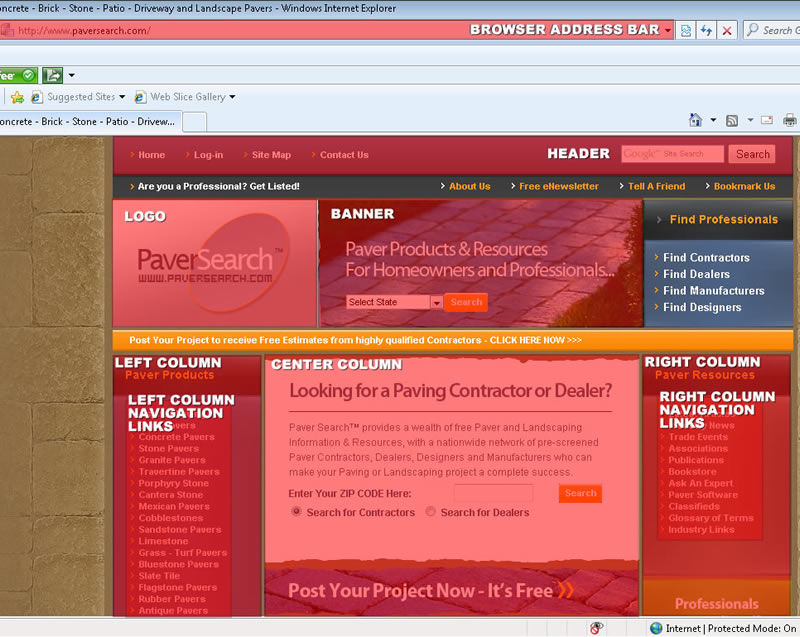
The Parts of a Website
- Header
- Banner
- Left Column
- Center Column
- Right Column
- Left Navigation Links
- Right Navigation Links
- Browser Address Bar
- Page Heading
- Drop Down Menu
How to Write Instructions
1. What pages do you want to update?
It is important to state exactly what pages you want your changes done to.
If you want the changes done to the entire website you must specify that. If you want the changes done on only one page, you must specify that page. Write the full URL of the page which you want edited. (you can find the URL of any page in your browsers Address Bar)
There are two kinds of pages on your website:
1. Home page
2. All other pages. We refer to these as inside pagesIf you want to update only the home page then specify: "On the home page"
If you want to update all pages of your site then specify: "on all pages"
For other individual pages please specify the URL of that page.
Example:
http://website.com/contact-us.htmWhenever you are referring to a page on your website you it is crucial to it with the pages' full URL.
Right way:
"on: http://website.com/contact-us.htm"Wrong way:
"first, click on the about us tab, then scroll down and click on the contact link"Wrong way:
"on the contact page"
2. Describe what you want done with clarity. If you want to replace text, you must write what text you want replaced, if you want photos put in a gallery in multiple sub galleries (pools, landscape, patios) you must specify what photos go where.
Example:
"on http://website.com/contact-us.htm, please replace the current fax number with this one: xxx-xxx-xxxx"Example:
"on http://website.com/gallery.htm please add the attached photos to the landscaping gallery"
3. If ever in doubt, communicate more. It never hurts to type a bit more to drive a point home. Otherwise if something is un-clear it will have to be queried and that will take more time.
4. After writing instructions, re-read them from the view-point that you don't know anything about it, that you are looking at it for the first time, and see if it makes sense and communicates clearly.
5. If you want something done, you MUST say so. You cannot assume for someone at the other end to do something you didn't ask for.
Attaching Files and Images
In the Clear Imaging Ticket System you will find that you can make up to three attachments.
However this does not mean that you can only attach 3 photos or 3 Word Documents.
If you have many photos and documents, or even several folders of photos and documents, the only thing you have to do is:
- Create a folder on your computer
- Copy all the files you want to upload
- Paste them into the folder
- 'zip' or 'compress' the folder
- In the Clear Imaging system click on the 'browse' button to find the file you want to attach
- Select the zipped folder you created
As long as you put all your files in a folder and zip the folder you can upload any number of files.
Note
If you are sending images in multiple folders, all images must have a unique name. For example if in folder titled "landscaping" you have a photo called "1.jpg", and in folder titled "pools" you have a photo called "1.jpg". A more practical method would be to name them as: landscaping_01.jpg, and pools_01.jpg.
Uploading Attachments (Files or Images)
- Please scan all attachments for viruses before uploading files.
- The size of the 3 individual attachments you are uploading should be less than 30 Megabytes, with a total of 90 Megabytes or less, for each New Ticket.
- If your attachment(s) are larger than 90 Megabytes total, then please break your files into separate files and submit additional ticket(s) or notes. Or just burn the files to a CD or USB Flash drive and mail it to our Carson City mailing address. See our mailing address here »
- If you have more than 3 images/files to upload, put them all in 1 folder and Zip the folder before attaching it to the Ticket. (The Zip file size must be less than 90 Megabytes total)
- Do NOT submit multiple New Tickets for sending us photos or images. Rather, categorize all your photos into sub-folders within just 1 main folder, and then zip this main folder. Then upload the main zip file into a New Ticket.
- If you don't have Winzip software, you may simply use Windows Zip software, which comes standard with your PC. Simply "right-click" on the file or folder you wish to Zip, and select "Send to" and click on "Compressed 'zipped' Folder". This will Zip the file or folder and create a new file with a ".zip" file name. This is the file you will upload to your Ticket.
- File types that we accept are: jpg|jpeg|gif|png|bmp|mp3|mpg|mpeg|avi|rar|zip|txt|htm|html|ppt|xls|pdf|doc|docx
Different Types of Tickets
70% of your tickets will fall under the General category of website updates and will be very easy to communicate.
These are for example: adding photos to your photo gallery, adding new pages, replacing text and so on.
We will take up each one of these and show you how to properly write instructions for the ticket. You can use these examples as the format for your future tickets.
1. Replacing text
Ticket Example:
On: http://website.com/contact-us.htm
Find this: "We've been in business for 20 years"
Replace with this: "We've been in the industry for over 21 years"
2. Adding a new page
2. Name of the new link on your left navigation. Example: "Landscape Design"
3. Position of the new link on your left navigation. Example: "place the new link under 'home' "
4. Contents of the page. If you don't have any we will just put 'coming soon' in the meantime.
Ticket Example:
1. new page heading: Landscape Design Tips
2. new page link name: landscape design
3. new page link position: under home
4. new page text: 'coming soon'
3. Adding photos to photo gallery
Ticket Example:
On: http://website.com/gallery.htm
Add: attached folder of photos to the landscaping category
4. Promotional items - star flashes, banners, etc
Ticket Example:
On: every page of the website
Add: a starflash to the top right corner of the banner, with the text: "Summer Special 50% off"
5. Drop down menu
For example your website had five left navigation links: "home, about, services, testimonials, contact" And let us suppose you want to add some new pages titled: "landscaping and maintenance". In this case these two new pages would become 'sub menu items' under the 'services' page. In other words, when a visitor hovers his mouse over the 'services' link the two new pages will pop out below.
Ticket Example:
On: every page of the website
add: drop down menu under 'services' link. Make two sub pages: "landscaping and patios"
6. Facebook & Twitter Links
1. Setup your account with the social media website (Facebook, Twitter). It is important that you do this, we cannot do it for you.
2. Copy the URL to your company's web page. For example: http://www.facebook.com/#!/bestbuy
3. Create a website ticket in the Clear Imaging system. It is important to state exactly where you want the button to be placed on your website:
On all pages of the website, in the top right of the banner, place facebook button.
Button link: http://www.facebook.com/#!/bestbuy
7. Creating a photo slide show
Ticket Example:
On page "http://website.com/products.htm", create a photo slide show with the attached photos.
NOTE: remember if you want your photos in a specific order, you must state that order in your ticket
8. New banner photo
Ticket Example:
On all pages, replace current banner photo with the attached photo.
9. Adding Audio
Ticket Example:
Please add background audio to website. See attached audio file.
10. Adding Video
Ticket Example:
Create new page: "http://website.com/video.htm"
At the top of the page, place the following code from youtube: "<iframe width="560" height="349" src="http://www.youtube.com/embed/gfgeIZyrIM0" frameborder="0" allowfullscreen></iframe>"
Email Support
- Please first submit a New Ticket for email set up requests and email related issues before calling us. Otherwise we have no way of tracking the status of the issue. If need be, we will call you if we need more information to troubleshoot the issue.
- Tell us all of the email accounts you need and spell them accurately (in lower case), example:
joe@mywebsite.com
mary@mywebsite.com
OR
molly.jones@mywebsite.com
jim.smith@mywebsite.com - Tell us if you are setting up these email accounts via Outlook, Webmail, Cell Phone or other devices, so we can give you the proper settings.
- After, we send you back the proper email settings and password(s), you may go to our "Email Setup" guide which is located at the top of our header bar links in the Ticket System. This section has instructions for how to set up email accounts for various email programs.
- You also have the option of using our web-based Horde email program "Webmail" as opposed to using other email programs such Outlook. Our Webmail email program is accessible online, remotely from any PC that has internet access. It works similar to Yahoo mail or Gmail. Refer to our "Email Setup" guide in the Ticket System for Webmail set up instructions.
- If you have issues setting up your new email accounts, and have already followed our "Email Setup" guide instructions, then call our Email Support Hotline, which is accessible in the Ticket System.
- If your existing email accounts suddenly stops working, first check with your ISP (Internet Service Provider) to make sure you still have a solid internet connection before calling our Email Support Hotline.
- If your emails are being rejected by certain people, please submit a New Ticket and tell us which email addresses you are sending out to so we can troubleshoot the issue.
- If you suddenly start receiving larger than usual amounts of spam or virus attachments, please submit a New Ticket and tell us which of your email addresses you are receiving the spam to, so we can troubleshoot the issue.
- Do NOT use your email address to send out mass emails or spam emails otherwise your entire company email addresses will get blacklisted from major Internet Service Providers and you will not be able to send regular emails any longer. Rather, use a legitimate email marketing provider such as Constant Contact.
- Below is a list of "Email Setup" instructions for various email programs.
- Click on the appropriate Email program you are using to get full Setup instructions:
- Outlook 2019
- Outlook 2016
- Outlook 2013
- Outlook 2010
- Outlook 2007
- Outlook Express
- Outlook Version 5+
- Windows Live Mail
- Windows Mail
- Mac Mail
- IPad/IPhone
- Android
- Webmail
- BlackBerry
- Note: You must first submit a New Ticket asking us to set up the required Email Account(s) you need so we can send you the Password(s) for your respective Email Account(s).
Domain Name Support
- If you already have an existing Domain Name for your existing website, you MUST provide your Account Manager the "Username" and "Password" access to your Domain Registrar Account, before we can switch name servers and take your new website live on the Internet.
- It is possible to get a new or an additional Domain Name for your new website, you MUST ask your Account Manager to register a new Domain Name for you. Your first Domain Name is Free, and we automatically renew it for you each year, for Free.
- Additional Domain Names will cost you $25 per year. Or, we offer 5 year registration for $100.
- OR, you may register your new Domain Name yourself. Go here www.godaddy.com to check domain availability and then register with GO Daddy to purchase your Domain Name(s).
- We do NOT recommend pointing more than 2 additional Domain Names to your existing website, since it can be considered "Spamming" by search engines.
- Additional Domain Names will cost you $25 per year. Or, we offer 5 year registration for $100.
- If you have an existing Domain Name for your existing website, and you want us to take over the management of it, you MUST ask your Account Manager to submit a Domain Transfer. You will need to provide your Account Manager with the Domain Name "Authorization Code" from your current Registrar.
- If your Domain Name or Website is not showing on the Internet, chances are that you failed to renew your Domain Name. Regardless, please call our Tech Support line immediately at: 1-800-380-6942.
Billing Support
- You have the option to pay your Website monthly fees via the following payment methods:
- Credit Card (we prefer this payment method via Visa/MasterCard/Discovery/Amex)
- Electronic Check Debit (requires checking account number and routing number)
- Check Annually (must pay 12 months in advance)
- Check Semi-Annually (must pay 6 months in advance)
- Check Monthly (must pay each month in advance)
Note: For all forms of "Check" payments, we will email you an Invoice in advance of the due date.
- You can check your current Billing Method by logging in to your Ticket Support System and clicking on the "Billing Info" link in the top header bar navigation.
- You can update your Credit Card or Electronic Check info by logging in to your Ticket Support System and submit a "Help Request" asking us to email you an Update Registration Form that you can fax back in to us at: 1-800-380-6942.
- OR, you may update it over the phone by calling our Billing Support Team at: 1-800-380-6942 - You can change your Billing Method by logging in to your Ticket Support System and submit a "Help Request" asking us to email you an Update Registration Form that you can fax back in to us at: 1-800-380-6942.
- OR, you may change it over the phone by calling our Billing Support Team at: 1-800-380-6942 - We charge our Clients Credit Cards or Electronic Check on the 15th day of each calendar month or up to 1 week after the 15th. Your bank statement will always show a monthly charge from "Clear Imaging, Inc.".
Marketing Assistance
- If you ever have any questions regarding your Website Marketing status, feel free to call your dedicated Account Manager any time.
- Your dedicated Account Manager can assist you with any questions and make recommendations for improving your website's performance and lead generation.
- You can locate your dedicated Account Manager's phone number and email address by logging in to your Ticket Support System and visiting the Main Administration page. - We also highly recommend that you visit the "Marketing Toolbox" section on our main website to find just about everything you need to know about Online and Offline Marketing.
- Our Marketing Toolbox is jam packed with a host of Free, powerful Marketing Tips such as:
- Search Engine Optimization and Rankings
- Social Media Marketing
- Content Writing
- Mobile Websites
- Online Directories
Click here to visit our Marketing Toolbox »